

The Love Vine
Read on to find out the inspirations behind the idea OR
scroll down to get right to the step by step instructions.
The Bedroom Gets the Leftovers…
My bedroom has always gotten the leftovers. Everything in my home has been given priority over my cozy little sleeping space. It has been that way for the majority of 10 years of marriage. Just so we are clear, I’m exclusively talking about the wall decor people… so get your head out of the gutter. 😉

Vase Decor
Oh, Neglected Bedroom….
My unfortunate bedroom decor inadequacies get pushed aside because of the many other projects in shared spaces where kids and guests are filtering in and out regularly. As a result, my bedroom has been victim to the unwanted hodge podge of decorations from the rest of my home for years. I have a friend who moves often, much like myself. She told me she always decorates her bedroom first before any other room in the house. Her theory is, more or less, this special bedroom space is where it all starts and stops as a family on a number of levels (she goes into much more detail). I won’t tell you all the reasoning she shared with me but I do think she makes a great point.
The bedroom is the sanctuary for adults to connect and rest. A place to be refreshed and refueled before reentering the world of work, finance, parenting, socializing, and responsibility. When we leave this room we have a tendency to pick up our metaphoric backpack with the weight of our whole world on our shoulders. So, why not make it a priority to make sure we set that backpack down on the way in? Why not make it a place for our conscious and subconscious mind let down its guard and just rest? This is the space where that backpack can be ditched at the door. The sacred space you can recharge regardless of bills, laundry and meetings. Whether you are married or single, your bedroom is a uniquely distinctive location where you spend many hours of each day. Let’s be intentional and make it a spot we can deeply exhale and let the weight of the world slide off our shoulders. When we leave this restful space, let’s just leave that pesky old backpack where we dropped it. Seriously, doesn’t that sound amazing to you? It sounds amazing to me (see my challenge below for more on this backpack dropping business).
Large impact… on a budget…
Today we won’t tackle every bedroom wall but we can at least get a start and do it without the high price tag. The low-cost of this project will keep the financial backpack from getting back up on your shoulders and you can take one step towards the sanctuary you long to enjoy.

Decomposed Rose Pillow
My hubby and I are in a rental for the next few months so a large investment in wall art didn’t seem like a priority. However, the dull kacki walls and the angled ceiling were a gaping eye sore I just couldn’t bare above our bed any more.
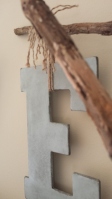
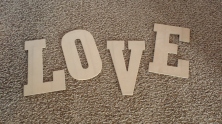
Originally, I decided to go for something simple: just the word LOVE over my bed. Purchasing “wall ready” letters for the word LOVE wasn’t an option as it turned out to be a pricey investment. As usual, I opted for my trusty spray paint and antiquing glaze alternative. Before I had a chance to start this project I found a vine in my brother/sister-in-law’s back yard that looked like the perfect fit and angle to add a little more depth to my simple LOVE look. So, I started working to combine the two ideas into one. I loved this new concept because I knew it would take up more real-estate on the large wall without translating into more dollars spent.
Full disclaimer: I have seen a few great pieces on Pinterest that have some similarity to this project. On my blog, you will simply get my take on the look.
One more thing about our metaphoric backpacks…
and a challenge
What you should know about me before you read the little side rant below is that I love Jesus, I have a lot of anxiety problems and I don’t sleep really well (reference anxiety problems). There are a lot of other things I would rather tell you about myself today but those three are the necessary tidbits for this particular writing. During the time I was working through the decor explanation and dropping off my “backpack” I was struck, convicted, even inspired. The room, the writing and the changed space have inspired me to try something new in my personal journey with Jesus. So, without further ado here it is:
Wall Decor
As someone who loves Jesus and follows Him I trust His word in Matthew 11 when He says He will give me rest. That His yoke is easy and His burden is light. So, with my new room and my new restful space I have a challenge for myself. I plan to post Matthew 11:28-30 on my door this week. For the upcoming month I will stop at the threshold of my room each day, read the specified verse and examine my “backpack”. What is in there? What am I holding on to from the day that I don’t need to keep in my grasp? What can I drop off in exchange for Jesus’ promise of rest? When I leave my room each morning I plan to read the verse again and make sure I don’t pick up that backpack. I can grab my schedule and my to do list but leave the extra rubbish off my back. Maybe, just maybe, that 2 minute mental challenge and prayer will translate into a little less anxiety and a little more sleep. Maybe it will mean a little more peace in each day. I’m going to level with you, I would like that, a lot. It’s really every anxiety chic’s dream… or at least mine. I will, of course, share my findings at the conclusion of my month. As always with Jesus, it will likely be surprising and incredible.
YOUR CHALLENGE: Join me, for a week or even a month: When you walk over the threshold of your bedroom door read Matthew 11:28-30, say a prayer and drop the backpack: including anything new that’s hopped into it throughout the day. When you leave through the threshold in the morning don’t pick it back up, read the verse and pray again….. Also, for goodness sake work on that room decor while you’re at it. 😉
*Not sure about Jesus? Why not give it a try anyway? What have you got to lose? 2 minutes a day? Seems like very little in lieu of what you may gain…
And this, friends, is why I love decorating and making spaces beautiful. It is transcendent for me. I become more fully myself and who I was created to be. I’m weird like that and happy to be so because apparently that’s how I was created. I hope and pray your bedroom may transform into a life-giving space for you this month.
“Come to me, all you who are weary and burdened, and I will give you rest. Take my yoke upon you and learn from me, for I am gentle and humble in heart, and you will find rest for your souls. For my yoke is easy and my burden is light.” -Jesus (Matthew 11:28-30)
See below for the supplies and step by step instructions to make this wall art!
It’s a pretty easy project… YOU CAN DO IT!
Happy creating!
The LOVE Vine
11 Steps Start HERE!

The LOVE Vine
My cost: Approx: $20. I had a large portion of the supplies so my cost was a bit lower but if you need to buy All Supplies: $28. You will have leftovers for your next creative venture.
Here are the supplies you will need:
Cost Supply
$2.80 per letter for your wall art: I chose pressed wood 13” letters, Hobby Lobby
$2.97 pack of sandpaper
$5.99 1 can: Krylon Pewter Gray Gloss Spray Paint + Primer, Hobby Lobby
$9.49 per jar: Valspar Signature Colors Half Pint Antiquing Glaze, Lowes
$0.88 per roll: Heavy Twine, Wal-Mart
$0.00 Vine/Branch: Get a hack saw and your boots and start searching (legally)
Automatic Hand Sander (optional)
Drop Cloth: Old sheet, shower curtain, tarp or box
2x4s, small boxes or even plastic cups
Hot glue gun and glue
4-5 Nails
Hammer
Gloves, Mask and Safety Glasses (Always wear when working!)
Wooden Letters
1. Choose your letter style and size!
I used letters that are 13” high. I chose pressed wood over solid wood to save money and it ended up being a great option because of the way it absorbed the paint and antiquing glaze in a really spectacular way.

Hello Sandpaper
2. Sand… just a little
A little hand sanding goes a long way in making the letter edges less jagged. I used an automatic hand sander (150 grit paper) on all the corners and edges to smooth. This is an optional step but it only took about 5 minutes and was well worth it.

Spray Painted Letters
3. Spray paint!
Prep: Put a tarp, shower curtain, box or old sheet underneath your project to protect the ground from overspray. Use old 2x4s or small boxes to prop up the letters for better paint coverage. Wear goggles, gloves and a mask and paint in a well ventilated area.
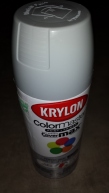
Pewter Gray Spray Paint
I’m always about more coats when spray painting! I always assume it will take a minimum of 2 to 3 thin coats to get the desired look. It is much more work to fix a paint run than just take the time to do an extra coat of paint. Wait a minimum of 10 minutes between coats of paint and handling (check the can for more detailed instructions). I often wait a day after painting the final coat to give it additional time to cure. The paint will not go on as evenly when spray painting pressed wood but we will add antiquing glaze so an unevenly painted surface is completely acceptable… even preferred in this case.
Choose the paint color you desire. I used a Krylon Paint and Primer mix. Pewter Gray: Gloss. Usually I try to avoid gloss paints but for this project, I knew that the combination of the pressed wood and antiquing glaze would tone down the glossy finish.
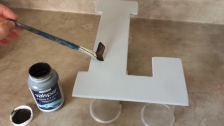
Apply Antiquing Glaze
4. Apply antiquing glaze to the letters with a brush
Due to the pressed wood finish, the glaze will absorb unevenly into the wood finish even though it has been painted. I loved the uneven look after the glaze, particularly on the edges that didn’t have as much paint covering them.

Antiquing Glaze Soaking In
5. Let the glaze rest on the surface
The longer the glaze is left on the darker the letters will be. I left it on about 2 or 3 minutes before wiping it off. A wood stain is another great way to get a finish similar to this. I just tend towards this because of the darker black tone, minimal odor and less messy clean up.
Wipe Off Excess Glaze
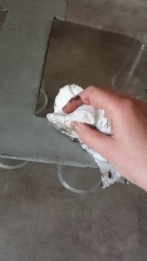
6. Wipe the antiquing glaze off the surface
I recommend an old cloth if you have one available. Also, wear gloves… yes, I am aware of the poor example I set in this picture. You know the saying… do as I say, not as I do… If the glaze isn’t staying on like you want it to or showing streaks (both happen often), just work with the glaze and cloth by dabbing and rubbing till the finish looks natural.
Too Light? If the glaze isn’t as dark as you expected then repeat steps 4 – 6 to darken the letters.
Too Dark? If the glaze is too dark add some water on the cloth and gently rub the wood to wipe off some of the antiquing glaze. Be sure to do this right after while the antiquing glaze is still wet. This works great with most finishes but the pressed wood will be a little tougher, again, because of how it absorbs liquids.
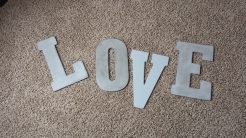
Letters in Glazing Process (V not completed yet)
*In Process… In the picture below, you can see that I have done 3 out of the 4 letters. V still remains unglazed. This is an example of how much it can darken and how differently the glaze can darken the wood of each letter depending on the paint and how long it sits on the surface.
Perfectionists: Let go and be okay with things not being 100% balanced and perfect. It adds to the look in the end… promise!

Vine Hunting
7. Find a great stick or vine… in your yard, the neighbor’s or the woods.
I recommend you obtain legally with permission—most people love getting rid of extra sticks. Cut or break to size, and if using a stick consider leaving the smaller branches on one end to add visual interest.
I went out to find the vine in my sister-in-law and brother-in-law’s back yard. Due to some miscommunication I had a very surprised bro-in-law taking pictures of the trespasser in his back yard (don’t worry, he figured it out before calling the police or shooting me with a BB gun). Also, it was the coldest day of the year so excuse my extreme likeness to Sasquatch.

All Tied Up with Twine
8. Cut and prep twine for the letters
I used rather narrow twine and made it thicker by layering 3 strands on each part of the letter that I hung. I chose this twine because it was free as I already had it on hand from another project.

Twine from the Back (Secured with Hot Glue)
9. Secure twine to letters with glue
I have some fear issues with over the bed decorations falling on me in the night so I glued the twine to the back of the letters to be certain they wouldn’t fall off and bruise one of our faces while we slept. The first night after I hung this I had lots of falling letter dreams. It was like a Sesame Street Nightmare.

Tied to Vine and Ready to Go
10. Secure the twine to the branch by knotting
I knotted the twine below and above the vine and unraveled the remaining twine ends. Each strand of twine is a combination of 3 smaller strands so I just unrolled and pulled it apart for an easy curly Q finish.
11. Hang the vine and letters on the wall and enjoy!
I hung the twine on a few nails while I arranged it just how I wanted it. Then I put nails through the twine on each letter under the vine. It seemed like a super sneaky way to hide the hardware. As well as very effective. See the pic below to see what happens when you don’t put enough nails on the wall (See why I was having Sesame Street Letter Attack Nightmares?).

Use Enough Nails to Avoid “Attack of the Letter People” Nightmares!
I chose to put the vine up at an angle to go with the our angled ceiling and to help fill the large amounts of empty spaces that needed to be transformed. You can use your own discernment to find just the right angle and height for your specific space. Deep breath perfectionists, you can do it, although it may be a bit of a stretch for you.
Once your new art is properly hung, enjoy!

My favorite LOVES…
Written By: Randa Smith


Nice work!
LikeLike
Thanks Barat! 🙂
LikeLike
First time I’ve read your blog & thoroughly enjoyed it. I will read Matthew 11 28-30 each day & ask God’s guidance & peace that we can experience through him. I do believe he wants that for all of us & I find that as I get older & trust him that I can be less anxious & happier(retirement has really helped that but I’ve also make a list every day of the things I want to accomplish & often I don’t complete the list but then those things go on to the next day’s list & I take the attitude many things & most importantly people are far more valuable than the things I do every day. Keep the faith & wonderful to keep in touch with you.
LikeLike
Thanks for sharing Carolyn… I enjoy keeping in touch with you too!
LikeLike